The Complete Guide to Crossing the Break on the Clarinet
One of the most difficult fundamentals on the clarinet is crossing the break (which I abbreviate CTB). For such a small interval, it can certainly pose a multitude of problems. Here’s everything players and teachers should know to cross the break with confidence!
What is the break?
The break is the transition from the chalumeau (low) register to the clarion (middle) register. (There is also the upper break, when you transition from the clarion to the altissimo register, but we’ll save that for another article.) When clarinetists first cross the break, they are probably moving from a throat tone (open G, G#/Ab, A, or Bb) to the middle of the staff (usually B or C).
Why is it so difficult to cross the break?
I vividly remember my middle school band director telling the clarinet section that middle B (in the middle of the staff) was the most difficult note to play on the clarinet. At the time, I didn’t think much of it, but looking back as a teacher, I realize that he was absolutely correct. There are several reasons why crossing the break can pose some challenges:
- You have to move several fingers at once. Most clarinet methods teach new notes and fingerings in an order which requires clarinetists to only move one or two fingers at a time. When you cross the break, particularly from a throat tone to middle B, you move all of your fingers at once. This can be difficult to coordinate at first.
- More fingers moving = more potential mistakes. The more fingers you move at the same time, the easier it is for one to be misplaced. If you’re moving one finger at a time, you can easily tell which finger/note is causing the issues. With all fingers moving at once, it’s more difficult to identify which finger (or even which hand) is contributing to any issues you experience.
- Pinky problems. Crossing the break can be particularly challenging for younger players whose hands/fingers are still growing, and smaller hands make reaching the pinky keys even more difficult. Additionally, I’ve worked with several clarinetists who are double jointed in their pinky fingers, which can pose further issues.
- You need more air. If you are moving from a throat tone to middle B or C, the length of the pipe is lengthened. Instead of air being able to escape from the left hand tone holes of the clarinet, it must now travel all the way out the bell. Additionally, higher notes means that the reed must vibrate more quickly, so students must have enough quantity and speed of air to produce the correct partial.
- Stress manifests itself in the form of biting and squeezing. Many students unintentionally bite the reed or squeeze their fingers to “help” make crossing the break easier, but this creates more challenges than it solves.
(Fun fact: It’s called the break because sometimes it makes you want to break your clarinet out of frustration. Just kidding!)
Finger Fundamentals
Now that we’ve discussed the challenges of crossing the break, let’s break down the break!
In my experience, one of the most common causes of squeaks or notes not speaking when crossing the break stems from the placement of the left hand thumb or pointer finger.
The left hand thumb should be pointed towards 2 o’clock (the upper post to the right of the thumb). This placement will allow the tip of the thumb to press the register key without disrupting the thumb’s ability to also cover the thumb hole. If the thumb is straight up (12 o’clock) or directly pointed to the right (3 o’clock), this position makes it more difficult to hit both the register key and cover the thumb hole.
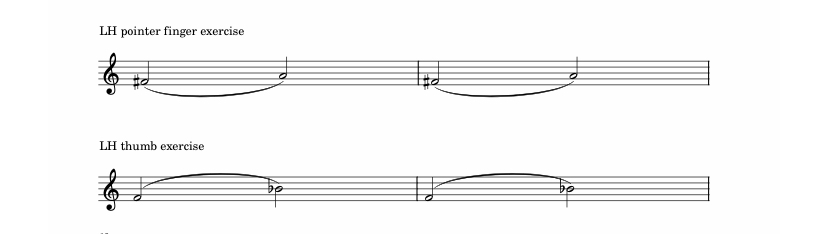
Once you’ve established that the LH thumb is correctly position, it’s time to check the motion LH pointer finger. Play the exercise below and make sure that your pointer finger is rolling to the A key and not lifting and hitting the A key. If you are rolling correctly from the F# to the A, the side of your pointer will hit the A key (instead of the pad of your pointer finger). This rolling motion facilitates a smoother connection when crossing the break.
Finally, play the clarinet’s lowest note – low E. Play this in front of a mirror or record yourself while playing. Now, check your right hand ring finger position. This is the largest tone hole on the clarinet, so if your finger is not perfectly placed, there can be tiny air leaks which can cause squeaks or the note not to sound. Make sure you are using the pad of your ring finger to completely cover the tone hole. This is one of the most common issues I see with students first attempting to cross the break, and it’s one of the first things I check when any issues arise.
Here are a few exercises I have my students practice to check their finger positions before crossing the break:
Resonance Fingerings
Once you’ve made sure that your finger position is correct, it’s time to review resonance fingerings.
Resonance fingerings are altered throat tone fingerings to enhance the quality of tone, timbre, and technique and can make crossing the break a lot easier. I’ve written an article with everything you need to know about resonance fingerings, so make sure you are embracing them to make crossing the break a breeze.
Here’s how resonance fingerings make crossing the break much easier:
- If the right hand is already covered, there are fewer fingers you have to move at the same time.
- Fewer fingers moving simultaneously means fewer likelihood of finger mishaps.
- If your right hand is already down (with proper placement), it’s easier to troubleshoot any issues.
- It improves tone and tuning.
- It makes your throat tones and clarion register more closely match in quality of sound (aka timbre).
CTB Hack – Start Backwards
When I’m working with students on crossing the break, I go in reverse. Many clarinet methods introduce the break by having students play from Bb to B natural, but as I said above, this presents several challenges.
Instead, I work backwards.
Start by playing middle B. Play this several times until you feel confident to play this note without any squeaks, hesitations, or low quality sounds. Once you can successfully play this note, you’ve already won half the battle.
Now, play middle B and go down to a throat tone Bb.
Repeat several times until this feels comfortable.
Pause, then try this exercise in reverse. Start on throat tone Bb and go up to middle B.
If you have trouble going up over the break, troubleshoot any potential issues. (Spoiler alert: it’s probably your fingers. If so, review the finger fundamentals above).
CTB Hack – Start with larger intervals
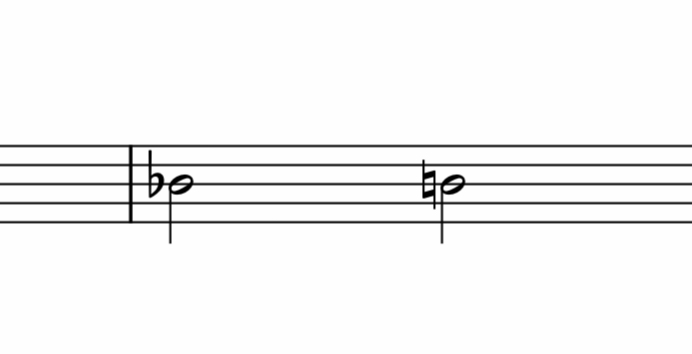
Although it might seem counterintuitive, reaching the clarion register might be easier with a larger interval. Try playing a 12th below and adding the register key to build up your air support and check the placement of your left hand thumb when hitting the register key. Here are a few examples:

The moment of truth – crossing the break
After you’ve reviewed your finger positions and embraced resonance fingerings, it’s time for the big moment – crossing the break from throat tones!
After you feel comfortable doing the exercises above, play open G and try to go to middle B or C (make sure you keep your right hand down). After practicing the previous exercises, this should feel much easier than if you began with this approach. Once you feel comfortable going from open G, try to go from G#/Ab, then A, then Bb. The key to crossing the break with confidence is slow repetitions which allow you to examine your finger positions, embouchure, air, and troubleshoot any other issues.
CTB deal-breakers
- Poor finger placement/position (especially the LH thumb, LH pointer finger, and RH ring finger)
- Biting or squeezing the reed. Make sure there is no excess pressure or tension in your embouchure.
- Not using enough quantity of air. Play loud and proud when crossing the break to make sure air is not an issue.
- Air speed is too slow. Remember, higher notes mean the reed has to vibrate faster, so make sure you air is helping and not hindering.
- Fingers not curved. Take a second and rest your arms by your side. This is ideal clarinet hand position – lightly curved fingers with no tension. Make sure your fingers aren’t locking or losing their natural position.
- Resting the bell in your knees. This can stop the air from exiting, so even if you’re doing everything correctly, it can be difficult to produce a sound.
And finally, practice with patience. There will probably be many squeaks and less-than-ideal sounds, but this is very normal. Be patient and analytical when crossing the break to identify and troubleshoot potential issues and how to resolve them. Practice several slow repetitions to train your muscles, and use your air.
If you’d like some dedicated exercises to help you improve this fundamental, check out my Crossing the Break Long Tones and Crossing the Break Exercises.
I hope this helps you break down the break on clarinet!
Happy practicing!
One Comment
Keith Arnold
Dear super teacher,
Thank you for your kindness, and great ability!!
Keith Arnold, Cedar City, Utah