The Complete Guide to Clarinet Pinky Fingerings
When you first picked up a clarinet, you probably noticed that it has quite a lot of keys (especially if we compare it to a trumpet or trombone)!
Even though there are a lot of keys on the clarinet, each finger has its designated place, and the mechanics of the clarinet are relatively straightforward until you get to the pinky keys (we’ll save the side and throat tone keys for another day).
The pinky keys (as many clarinetists call them) are controlled by the pinky finger on the left and right hand. It’s ironic that our weakest finger is in charge of controlling four keys on each pinky! (Note: This article is in reference to the standard Boehm system clarinet without the alternate Eb/Ab key on the left. If you are using a German or other system clarinet, the fingerings and rules will be different.)
If you take a few seconds, you can press a pinky key on either side and watch how it corresponds to the keywork of the other hand. I recommend students do this so they can gain a better understanding of which keys work together to play the same notes.
Now that you’ve familiarized yourself with the pinky keys, let’s talk about their fingerings. I’ve created this fingering chart for the pinky keys to help you learn the notes and all fingerings.
What is the pinky rule?
Now that you know all of the pinky fingerings, it’s time to share an important rule of clarinet-playing – the pinky rule!
Simply put, thou shalt not use the same pinky twice in a row. Meaning you can’t play a low E on the right followed by a low F on the right, because that uses the right pinky twice in a row. Instead, you must learn to alternate pinky fingers to create a seamless connection between notes and increase your technical dexterity.
(There are a few exceptions to this rule, as we’ll see below.)
Why is this important?
Many students are resistant to adhering by the pinky rule because it’s frustrating to break bad habits they might have developed. Learning (or relearning) these pinky rules does take time and practice, but you will have much greater technique and agility after you have incorporated this skill.
(Funny teacher anecdote: When I am working with beginning clarinetists, I am a stickler for using the proper pinky orders, and I call myself the pinky police. Sometimes I give tickets or warnings for misuse of pinky fingers.)
How do you create a pinky plan?
When working on a piece of music with several pinky notes in a row, you should map out the order you must use your pinky fingers. Some music has a few different options, but if there is an Eb or low G#, there will mostly likely be only one solution. (This is because the standard Boehm system clarinet only has one fingering for this note, so the other pinky note order is determined by this.)
Tips for approaching the pinky rules:
- Learn the note names and their placement on the staff with the fingerings. Make sure that you not only know the fingering of each note, but where it is on the music staff so you can quickly and easily improve your note recognition and technique. (Use my pinky fingering guide to learn all of the pinky fingerings.)
- Respect Eb/Ab. Whether you’re playing low Ab/G# or higher Eb/D#, there is only one pinky key for this note, so the pinky order will be determined by this note.
- Make a pinky plan. When you encounter music that uses a lot of “pinky notes,” take time to map out the pinky order you must use. (Pro tip: Start with the final note in the sequence and work backwards! This will save you lots of trial and error.)
- For scales, begin with the right pinky. Spoiler alert – all major and minor scales on clarinet should begin with you using the right pinky to avoid any finger fumbles. (Even on scales like D major which can be fingered LR and RL, it’s easier to stick with the same pinky pattern as you use on other scales.)
- Write in the pinky order and fingering. This is the simplest but most effective solution – just write an L or R above the notes in your music. I still do this today on new pieces, and there’s no shame in giving yourself a helpful reminder.
Flip and Slide
Sometimes, composers seem to forget that we don’t have an extra hand to use, and you must break these pinky rules. (*gasp*)
If you map out the pinky order and see that it is impossible to create an alternating sequence of LRLR or RLRL, then you have to find another solution.
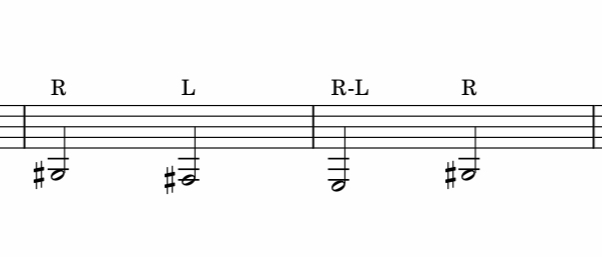
If the piece is slower, you might have time to flip pinky fingers. For example, if you are playing the descending E major scale down to low E, you will end up on right E if you follow the pinky rules. However, the arpeggio goes from E to G#, which is difficult to do from right E. One solution for this is to flip your pinky fingers by adding your left pinky E while sustaining low E, then lifting the right pinky. You have successfully flipped to left low E, easily allowing you to play G# on the right.
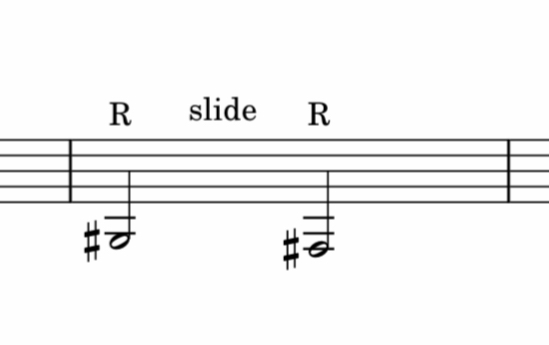
Another option is to slide your pinky from one key to another. This is usually easier when sliding from an “upper” key to a “lower” key. An example would be sliding from low G# (right) to low F# (right), which is much easier than sliding these notes in reverse, since it is more difficult to maneuver your pinky while maintaining a seamless sound.
Want more pinky practice? I’ve created my Pinky Puzzlers and Pinky Strength Training Exercises to help you improve your pinky pattern recognition, finger dexterity, and overall technique. This is great for both students and teachers!
I hope this guide helps you understand the pinky keys and pinky rule. Leave a comment below with any questions, and happy practicing!
2 Comments
Annelies
Work backwards. Never thought about it. What a great tip. Thank you so much! This will save time.
jennyclarinet
Glad to hear it’s helpful! Happy practicing!